How to Root Samsung Galaxy GT Series

24 11 2012
Samsung Galaxy GT Series အမ်ိဳးစားမ်ားအား Universal Gingerbread Root ၿဖင့္ Root ၿပဳလုပ္နည္း ။

Model ေတြကေတာ့ ….
SAMSUNG GALAXY
GT-S5570, GT-S5570B, GT-S5570I, GT-S5570L, GT-S5660, GT-S5660M, GT-S5660L, GT-S5660V, SHW-M290K (Korean GIO), GT-S5670, GT-S5670B, GT-S5670L, GT-S5830, GT-S5830B, GT-S5830C ,GT-S5830D, GT-S5830i, GT-S5830L, GT-S5830M, GT-B7510, GT-B7510B, GT-B7510L, GT-B7800, GT-B7800L, GT-B5510, GT-B5510B, GT-B5510L, GT-B5512, GT-B5512B, GT-S6102, GT-S5360, GT-S5360L, GT-S5360T, GT-S5363, GT-S5369, GT-S5690, GT-S5690L, GT-I8150, GT-I8150B, GT-I5510, GT-I5510B, GT-I5510L, GT-I5510M, GT-I5510T.

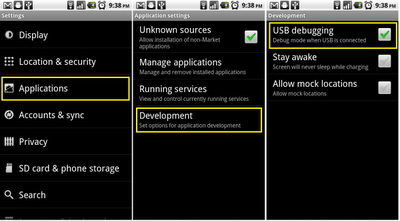
Root မလုပ္ခင္ အရင္ဆံုး  ဖုန္းမွာ  Unknown Sources ကို  Enable လုပ္ေပးပါ ။
           Click  on   Settings – > Application – > Unknown sources 


USB debugging ကို Enable လုပ္ထားေပးပါ ။
Setting -> Application -> Development -> USB debugging
-> Enable 


ေႀသာ္…. ေမ့ေနလို ့  Samsung USB Driver လဲ Install လုပ္ထားပါအုန္း ။
Samsung Kies မလိုဘဲ Samsung USB Driver တစ္ခုထဲနဲ ့တင္ရပါတယ္ ။
Samsung USB Driver က အားလံုးေသာ Samsung Mobile Devices မ်ားအတြက္ပါ ၊ 
S III အပါအဝင္ေပါ့ ။
Samsung USB Driver ကို ဒီမွာ ယူပါ ။ ( PW: wahgyi )


INSTRUCTIONS
Unzip the Downloaded File
Install the Driver
Reboot your PC
Plug in your device & have fun!


Root  လုပ္မဲ့  Universal Gingerbread Root ကို ဒီမွာ ယူပါ ။ ( PW: wahgyi )

USB cable ႏွင္႔ ဖုန္းကို ခ်ိတ္ဆက္ပါ ။  
USB connected box ( Select to copy files to/from your computer )
တက္လာပါမယ္။ ေရြးေပးပါ။

 
Universal Gingerbread Root.zip ကို SD card ထဲသို႔ Copy ကူးထည္႔ေပးပါ ။ 
ၿပီးလွ်င္ ” Disconnect storage from PC ” ကို ႏိွပ္ပ္ၿပီး 

ဖုန္းမွာ တက္ထားေသာ USB cable ကိုၿဖဳတ္ေပးပါ။
ၿပီးလွ်င္  ဖုန္းကို ပါ၀ါပိတ္ေပးပါ ။
 

Recovery mode ၀င္နည္း  
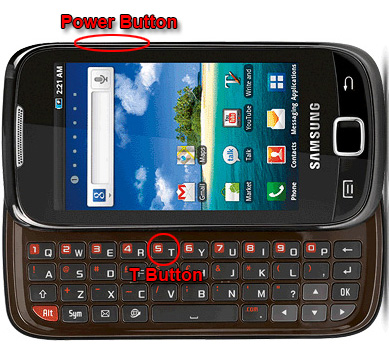
Model : 551, Pro
*** စၿပီး ၿပဳလုပ္တဲ႔အခ်ိန္မွာ အခုၿပထားေပးတဲ႔ အတိုင္း စဖို႔လိုအပ္ပါတယ္ ။ ***
( T Button ) + ( Power Button ) ကို တြဲၿပီး စုံႏွိပ္ထားေပးပါ ။


Recovery mode ၀င္နည္း 
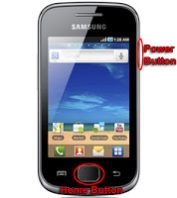
Model :  Ace, Gio, Fit, Mini, Pop
*** စၿပီး ၿပဳလုပ္တဲ႔အခ်ိန္မွာ အခုၿပထားေပးတဲ႔ အတိုင္း စဖို႔လိုအပ္ပါတယ္ ။ *** 

( Power Button ) + ( Home Button ) ကို တြဲၿပီး စုံႏွိပ္ထားေပးပါ ။  


Recovery mode ၀င္နည္း  
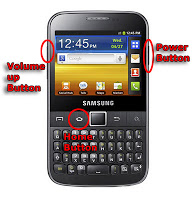
Ace GT-S5830i, Xcover, Young, Y-Duos, Y-Pro, Y-Pro Duos, M-Pro
*** စၿပီး ၿပဳလုပ္တဲ႔အခ်ိန္မွာ အခုၿပထားေပးတဲ႔ အတိုင္း စဖို႔လိုအပ္ပါတယ္ ။ ***  
( Power Button ) + ( Volume Up Button ) + ( Home Button )  
 ကို တြဲၿပီး စုံႏွိပ္ထားေပးပါ ။


အထက္မွာ ေဖာ္ၿပေပးထားတဲ႔အတိုင္း သက္ဆိုင္ရာ Recovery mode ကို
second အနည္းငယ္ တြဲႏွိပ္ထားၿပီးတဲ႔အခါ မိတ္ေဆြ ဖုန္းက Recovery mode
ကိုေရာက္ရွိသြားပါမယ္။
Recovery mode မွာ အေပၚေအာက္ ေရြးဖို႔အတြက္ ( Volume – / Volume + ) ကို
အသုံးၿပဳၿပီး မိတ္ေဆြ ဖုန္း SD card ထဲသို႔ ထည္႔ထားေသာ Universal Gingerbread Root.zip
ဖိုင္ကိုေရြးၿပီး Home button ကိုေရြးၿပီး apply လုပ္ေပးပါ ။


Install form sdcard complete ” စာတန္းကို ၿမင္ရပါမယ္။
” reboot system now ” ကိုေရြးၿပီး Home button ကိုႏွိပ္ေပးပါ။
ဖုန္း ၿပန္တက္လာၿပီဆိုလွ်င္ superuser icon ေလးနဲ႔အတူ
ဖုန္းကို root ေအာင္ၿမင္စြာ ၿပဳလုပ္ၿပီးသြားပါၿပီ။


ၿမန္မာႏိုင္ငံ မွ Viber ကို ဘယ္လို Activate လုပ္ရမလဲ ???

17 11 2012
ၿမန္မာႏိုင္ငံ မွ မိတ္ေဆြ အေပါင္းအသင္းမ်ား အတြက္ …..

Viber ကို  Download  ယူၿပီး Phone ထဲသို ့ Install လုပ္ပါ ။
ၿပီးလွ်င္ ေအာက္က ပံုေလးေတြ အတိုင္းလိုက္လုပ္ပါ ။

၁ ။  Continue  ကို ႏိွပ္ပါ ။

၂ ။  Country Code ” Myanmar ” ကိုေရြးပါ ။  [ Myanmar (+95) ] 
      မိမိ Phone နံပါတ္ကို ရိုက္ထည့္ပါ ။  ( ဥပမာ – 9 – 5151456 )

၃ ။  Continue  ကို ႏိွပ္ပါ ။

၄ ။  Viber မွ ေပးေသာ Code ကို ရိုက္ထည့္ပါ ။


       အဲ့ဒီ အဆင့္ က အေရးအႀကီးဆံုးပါဘဲ ။
      Viber  က  Code ကို SMS သို ့မဟုတ္ Voice Call နဲ ့ေပးပါတယ္ ။
      ၿမန္မာႏိုင္ငံ  မွာေတာ့ SMS နဲ ့ ပို ့တဲ့ Viber Code ကို ေစာင့္ေနရင္ ေမာပါမယ္ ။


      Viber ကေပးမဲ့ Code မွတ္ဖို ့အတြက္ စာရြက္နဲ ့ေဘာပန္ အသင့္ေဆာင္ထားပါ ။

     ဘာ့ေႀကာင့္လဲဆိုေတာ့ 

     Code မွားရင္ ေနာက္တစ္ႀကိမ္ Code ၿပန္ရဖို ့အတြက္ ( ၂၄ ) နာရီ ၿပန္ေစာင့္ရပါတယ္ ။

      ဒါ့ေႀကာင့္…… ေအာက္က ပံုေလးအတိုင္း  
      If you haven’t received an SMS with      your access code within 60 seconds, 
      click  Here  ကို ႏိွပ္ပါ ။


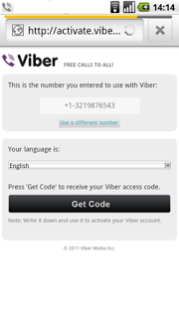
        ၿပီးရင္   Get  Code  ကို ႏိွပ္ပါ ။


   ၅ ။  ခဏေစာင့္ပါ ။ Viber မွ သင့္ဆီကို Automatic call ေခၚပါမယ္ ။
         Viber မွေၿပာေသာ Code ကို ေသေသခ်ာခ်ာ ရိုက္ထည့္လိုက္ပါ ။


၆ ။  Enter  Viber  ကို ႏိွပ္ပါ ။
      မိတ္ေဆြ …..  Viber  ကို အသံုးၿပဳႏိုင္ပါၿပီ ။
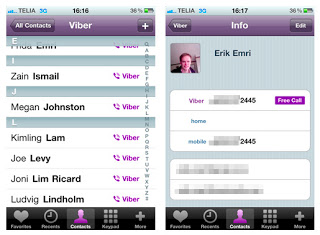
      Viber Contacts ထဲမွာ သင့္ ဖုန္း ရဲ ့ Contact List မွ Viber အသံုးၿပဳသူမ်ားကို ေတြ ့ရပါမယ္ ။


အဆင္ေၿပပါေစ ။


All Mobile Secret Code 2013 and Nokia Cable Finder Application

17 11 2012

Mobile  Phone Brand ေတာ္ေတာ္စံုစံု 

(Nokia, Samsung, LG, Motorola, China and All Others Mobile Phone) 

အစရိွတဲ့ ဖုန္းေတြရဲ ့ Secret Codes ေတြအၿပင္ 

Nokia အတြက္ Cable Finder လဲပါပါတယ္ ။

exe file အၿဖစ္နဲ ့လုပ္ထားတာပါ ။ 

File ရဲ ့ မူလပိုင္ရွင္ကေတာ့ India ကလို ့ယူဆရပါတယ္ ။ 

Credit to : Free-Soft


Mobile Codes File ကို ဒီမွာ ယူပါ


Samsung Secret Codes For All Model Of Mobile

17 11 2012

Samsung  Mobile ဖုန္း Model ေတာ္ေတာ္မ်ားမ်ား ရဲ  ့ 

Secret Codes တစ္ခ်ိဳ ့ ကို အသံုးဝင္မယ္ ထင္လို ့ တင္ေပးလိုက္ပါတယ္ ။

 Credit  to : princehackers

*#06#                         Show IMEI
*#0001#                     Displays the Device Serial
                                     Number
*#1234#                     Displays the Firmware
                                     Version
*#2222#                     Displays the Hardware
                                     Version
*#9998*246#            Displays the Battery Status
                                     and Memory Capacity
*#9998*228#             Battery status 
                                 (capacity, voltage, temperature)
*#9998*324#             Open the Debug Screen,
                                   some units use *#8999*324#
*#9998*523#             Adjust the LCD Contrast
*#8999*523#             Adjust the LCD Brightness
*#8999*842#             Vibration Test
*#9998*289#             Alarm Test
*#8999*289#             Ringtone Test
*#9125#                     Displays a Smiley
*#0228#                     Battery Information
*#8999*636#             Displays the Storage capacity
*#8999*778#             Sim card information display
*#8999*782#             Date and Alarm Display
*#8999*638#             Displays the Network
                                     Information
*#8999*9266#           Shows the current channel
                                      and strength

*#9999#                     Show Software Version
*#0837#                     Show Software Version
                                     (instructions)
*#0523#                     LCD Contrast

*#8999*8378#          Access the test menu
*#4777*8665#          GPRS Menu Tool
*#8999*377#            Opens the error log
*#8999*327#            EEP Menu
*#92782#                  WAP Phone Model
*#232337#                Bluetooth MAC Address
#*5737425#              Java Mode
*#5282837#              Java Version

#*4773#                     Incremental Redundancy
#*7785#                     Resets the Wake-up variables
#*7200#                     Mute the tone generator
#*3888#                     Bluetooth test menu
#*2077#                     GPRS Toggle
#*2027#                     GPRS Toggle
#*0227#                     GPRS Toggle
#*0277#                     GPRS Toggle
#7263867#                 RAM Dump
*2767*688#               Resets Mobile TV
*2767*226372#        Deletes all photos and resets
                                     the Camera
*2767*927#               WAP Reset
#*2562#                     Reboots the device
#*3849#                     Reboots the device
#*7337#                     Reboots the device and
                                     resets WAP settings
#*7288#                     Attach/Detach GPRS
#*7287#                     Attach/Detach GPRS
#*2886#                     Activate or Deactivate the
                                     Auto answer

#*5376#                    Deletes all SMSs
#*3270#                    Toggle DCS Support
#*3476#                    Activate/Deactivate EGSM
#*3282#                    Activate/Deactivate Data
#*4760#                    Activate/Deactivate GSM
#*3676#                    Formats the Flash Drive
#*7722#                    Activate/Deactivate RLC
                                    bitmap compression
#*2351#                    Blinks 1347E201 in RED
#*7878#                    FirstStartup (0=NO, 1=YES
#*3838#                    Blinks 3D030300 in RED

#*2527#                    Change the GPRS Class
*#8999*364#            Enable/Disable Watchdog
*#8999*427#            Configure the Watchdog
                                     Route
*2767*3855#             Hard Reset, deletes
                              everything including storage cards
*2767*2878#             Customized Hard Reset
#*3273#                     Change the EDGE Class
#*4263#                     Activates or Deactivates the
                                     Handsfree
#*3941#                     115200 bps loop test
#*5176#                     L1 Sleep
#*7462#                     Sim Phase
#*7983#                     Voltage and Frequency 
                                     Display


This All For Lock And Unlock :-


*#7465625#           Display the Phone Lock Status
*7465625*638*Code#    Enable the Network Lock
#7465625*638*Code#   Disable the Network Lock
*7465625*782*Code#     Enable the Subset Lock
#7465625*782*Code#    Disable the Subset Lock
*7465625*228#               Enable Activa Lock
#7465625*228#               Disable Activa Lock

#7465625*28638#          Disable the Automatic
                                           Network Lock
*7465625*28782#           Enable the Automatic 
                                           Subset  Lock
#7465625*28782#          Disable the Automatic
                                           Subset Lock
*7465625*2877#            Enable the Automatic 
                                          Service Provider Lock
#7465625*2877#           Disable the Automatic 
                                          Service Provider Lock

*7465625*77*Code#      Enable the Service
                                           Provider Lock
#7465625*77*Code#     Disable the Server
                                          Provider Lock
*7465625*746*Code#    Enables the Sim Lock
#7465625*746*Code#   Disables the Sim Lock
*7465625*27*Code#      Enables the CP Lock
#7465625*27*Code#     Disables the CP Lock
*7465625*28638#          Enable the Automatic Network Lock

*7465625*2827#      Enable the Automatic CP Lock
#7465625*2827#     Disable the Automatic CP Lock
*7465625*28746#   Enable the Automatic SIM Lock
#7465625*28746# Disable the Automatic SIM Lock


Attention:-
There are two options to unlock a Samsung phone,
1) *#pw+15853649247w#.
2) Access the parameter menu via *#9998*627837793#


FOR NEW SGH (R210, T100, A300…) :-
if code is in format *#9998*xxx#
try write in this *#0xxx#
SGH-600
SGH-2100
*2767*3855# Full EEPROM Reset (THIS CODE REMMOVES SP-LOCK! 
but also changes IMEI to 447967-89-400044-0
*2767*2878# Custom EEPROM Reset

SGH E700
Unlocking:-
*2767*688# remove USER CODE and SIMLOCK

SGH V200
Unlocking:-
Power on the phone without SIM card and type these codes:
*2767*63342# and press green button
*2767*3855# and press green button
*2767*2878# and press green button
*2767*927# and press green button
*2767*7822573738# press button
Phone will be unlocked, but all trims are reseted !!!
Mobile phone must be fully charged

SGH S500
Unlocking:-
*2767*MVT# (*2767*688#) E2P MVT Reset
*#SIMLOCK# (*#7465625#)


GSM Internet Connection ကို WCDMA Connection လိုသံုးမယ္ ။

12 11 2012

How to change MPT GSM Internet Connection Speed to MPT WCDMA Internet Connection Speed.

ၿမန္မာ ႏိုင္ငံ မွာ MPT ရဲ  ့ေက်းဇူးေႀကာင့္ Mobile Phone နဲ ့ Internet ကို လူေတာ္ေတာ္မ်ားမ်ား 
အသံုးၿပဳလာႀကပါၿပီ ။ 
WCDMA ႏွင့္ Internet အသံုးၿပဳသူမ်ားကလည္း GSM Connection ထက္စာလွ်င္ သူတို ့ Connection ၿမန္ေႀကာင္းေၿပာႀကပါတယ္ ။  
GSM နဲ ့ အသံုးၿပဳတဲ့ Internet Connection လိပ္ကေလးလို ေႏွးေကြးေနလို ့စိတ္မပ်က္ပါနဲ ့ ။
Android Application ၿဖစ္တဲ့  Network  v 1.1 .apk  က GSM Connection ကို WCDMA Connection အတိုင္းအၿမန္ႏႈန္း ရေအာင္ လုပ္ေဆာင္ေပးပါမယ္ ။
စိတ္ဝင္စားသြားၿပီ မဟုတ္လား ????

ေႀသာ္ …. သိၿပီ ။ လူႀကီးမင္း စဥ္းစားေနတာက ….
သူေၿပာသလို  ဟုတ္မွ ဟုတ္ပါ့ မလား ????
တစ္မိနစ္ (၂) က်ပ္ ႏႈန္း ကေန (၄) က်ပ္ မ်ားၿဖစ္သြားမလား ????

အဲ့ဒီအတြက္ ဘာမွ စိတ္မပူပါနဲ ့ လူႀကီးမင္း ။
စိတ္ခ်စြာၿဖင့္ စမ္းသံုးႀကည့္ပါ ။
တကယ္ အၿမန္ႏႈန္းတတ္ပါတယ္ ။ တစ္မိနစ္လဲ ပံုမွန္အတိုင္း (၂) က်ပ္ႏႈန္းပါဘဲ ။

Downlaod  လုပ္ၿပီးရင္ Phone ထဲမွာ Install လုပ္ပါ ။
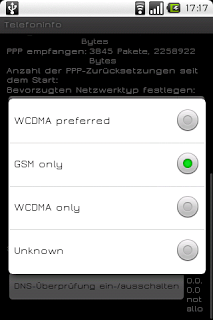
Set preferred network type: ရဲ႕ ေအာက္မွာ WCDMA only ဆိုတာေလးကိုေျပာင္းေပး
လိုက္ရင္ရပါျပီ ။   
GSM only ေနရာမွာ WCDMA only ဆိုဒါေလးကို ေျပာင္းေပးလိုက္ရင္ ရပါၿပီ ။

အဆင္ေၿပပါေစ ။


2012 Myanmar Calander for Mobile Phone .

19 01 2012
Java platform ( jar ) အသံုးၿပဳေသာ Nokia , Sony Ericsson Mobile Phone မ်ားအတြက္သာ ၿဖစ္ပါတယ္ ။

Application ထုတ္လုပ္သူကေတာ့ Sm³ Technology ၿဖစ္ပါတယ္ ။

                        Mobile Phone အတြက္ ၂၀၁၂ ၿမန္မာ ၿပကၡဒိန္ ကို ေဒါင္းလုပ္ ဆြဲပါ ။
                        အဲ့ဒီ File ကို Phone ရဲ ့ Memory Card ထဲသို ့ထည့္ပါ ။
                        Phone မွ တဆင့္ Memory Card Location သို ့သြားပါ ။
                        Install လုပ္ပါ ။

                                                                              ဒီလိုၿမင္ရပါမယ္ ။

Update Code A တြင္ 2508
Update Code B တြင္ 9125 ဟု ရိုက္ထည့္ျပီး
OK ကို ႏွိပ္ပါ။

ကဲ ….   ၂၀၁၂  ၿမန္မာ ၿပကၡဒိန္ အသံုးၿပဳလို ့ရပါၿပီ ။

Jar file ကို ဒီမွာေဒါင္းပါ ။

အဆင္မေၿပရင္ ၿပန္ေၿပာခဲ့ပါ ။


iPhone အတြက္ mp3 Ring tone လုပ္ႀကမယ္ ။

7 01 2012
iPhone နဲ ့ ပတ္သက္တဲ့  အေႀကာင္းေတြ  Software ေတြ ကို
စိတ္ဝင္စားမိေအာင္ လုပ္ေပးတဲ့  ညီမေလး ဖုန္းဖုန္း  ကို  ဒီေနရာကေန
ေက်းဇူးတင္ေႀကာင္းေၿပာပါရေစ ။

iPhone အတြက္ ring tone လုပ္ဖို ့အတြက္ အရင္တခါ ေရးခဲ့တဲ့ Post ထက္ ပို အဆင္ေၿပတာေလး ေတြ ့လို ့
Bigasoft iPhone Ringtone Maker v1.6.6.3600 Software Full version တင္ေပးလိုက္ပါတယ္ ။

အသံုးၿပဳပံု အဆင့္ဆင့္ကို ပံုေလးေတြ နဲ ့ရွင္းၿပထားေပးတယ္ေနာ္ ။

Mp3 Ring tone ၿဖတ္ၿပီး Generate လုပ္ၿပီးၿပီ ဆိုရင္ ….
iTune ထဲကို ေရာက္သြားၿပီ ။ မိုက္တယ္ေနာ္ ။

ဒီမွာေဒါင္းပါ ။
Password : wahgyi

အဆင္မေၿပရင္ ၿပန္ေၿပာခဲ့ပါ ။


How To Make Mp3 Ringtone On Iphone

2 01 2012

To make ringtones for iPhone, iPhone 3G, iPhone 3GS, iPhone 4, iPhone 4S using only iTunes:

1. Right click on the song you are going to make into a ringer and select “Get Info”.

2. Go to the “Options” tab and go down to the “Start Time” and “Stop Time” check boxes. Check both boxes and input the time you want your ringer to start/stop. The ringer has to be 30 seconds or less. Click “OK” when you’re done.

3. Right click on your newly “clipped” song and select “Create AAC Version”. The song will be re-encoded using the start and stop times determined (If your menu item does not read “Create AAC Version” and reads “Create MP3 Version”(or some other format) please go to “iTunes -> Edit -> Preferences -> General” and change the “Import Using” drop down menu to “AAC Encoder”).
make free ringtones for iPhone

4. After the song is done encoding navigate to your iTunes Music folder, locate your song, and drag it to your desktop. After the song is on your desktop go back to iTunes and delete the clipped version from you iTunes library (It won’t delete it from your desktop, it will only remove it from iTunes).

5. Go back the song on your desktop and right click on your song and chose “Properties”. Go to the name and extension section and change the extension from .m4a to .m4r (or you can just change the extension right from your desktop).

6. After the extension is changed simply double click on the file to add it to your iTunes library under the ringtones section. Sync your phone with iTunes and you’re done!

Note: Remember to go back into iTunes and uncheck your custom start and stop times for the original version of your song.